


A contractor induction is a mandatory pre-site-access process that verifies a contractor’s insurance, licences and competencies, then delivers a site-specific safety briefing before any work begins. Your immediate actions: request and verify all pre-arrival documents, then schedule the on-site briefing before the contractor sets foot on site.
The two core components are:
- Pre-arrival verification — confirm public liability insurance, workers’ compensation, licences, tickets and Safe Work Method Statements (SWMS) or Risk Assessment Method Statements (RAMS) before the contractor arrives.
- Site-specific safety briefing — cover site hazards, emergency procedures, permit-to-work requirements and PPE rules during or immediately before the first day on site.
Legally and practically, inductions must be completed before a contractor begins work. Getting this right protects your workers, your business and your licence to operate.
Key takeaways
A compliant contractor induction process requires two phases: pre-arrival document verification and a site-specific safety briefing, with records retained and access tied to induction status.
| Point | Details |
|---|---|
| Two phases are non-negotiable | Verify documents before arrival and deliver a site-specific briefing before work starts. |
| Signatures are not enough | Include a short comprehension check and record the result alongside the induction version. |
| 12-month validity baseline | Re-induct annually as a minimum, and immediately after site changes, incidents or extended absences. |
| Tie induction to access | Use QR passes, site cards or gate systems so lapsed inductions automatically block entry. |
| Ask Hayley reduces the admin | Compliance document storage, expiry reminders and custom induction templates are available via Ask Hayley. |
Table of Contents
- What does the contractor induction process actually cover?
- What are your legal duties under Australian WHS?
- What should your site induction checklist include?
- Which delivery method suits your site?
- How do you verify documents and keep records?
- When do contractors need to be re-inducted?
- A step-by-step contractor induction workflow
- How Ask Hayley helps you manage induction admin
- What actually goes wrong with contractor inductions?
- Induction admin without the paperwork pile
- Sources
What does the contractor induction process actually cover?
The contractor induction process applies to contractors, subcontractors, specialist suppliers and any unaccompanied worker entering a hazardous area. It does not typically apply to accompanied low-risk visitors or delivery personnel where alternative controls are in place, though a brief visitor orientation is still good practice.
The two-phase structure works like this:
- Phase 1 (pre-arrival): Collect and verify insurances, licences, competency cards, SWMS/RAMS and any site-specific pre-reading. Block access until this phase is cleared.
- Phase 2 (on-site briefing): Cover site-specific hazards, emergency procedures, muster points, permit systems and physical site layout. This phase cannot be replaced by paperwork alone.
It is worth being clear on terminology. A contractor induction is not the same as employee onboarding, which covers HR, payroll and culture. It is also distinct from a visitor orientation, which is typically shorter and does not require licence verification. The contractor induction sits between those two in scope and carries the most significant legal weight.
What are your legal duties under Australian WHS?
Under the Work Health and Safety Act 2011 (and its state equivalents), a Person Conducting a Business or Undertaking (PCBU) must provide information, training and supervision to ensure workers can carry out work safely. That duty extends to contractors. You must verify that contractors are competent before work starts, not after an incident.
Employer and PCBU responsibilities include:
- Providing a site-specific induction before access is granted
- Verifying that contractors hold current licences, tickets and insurance
- Ensuring SWMS or RAMS are in place for high-risk construction work
- Supervising contractors to confirm they follow site rules
Contractor responsibilities include:
- Providing correct licences, insurance certificates and SWMS/RAMS when requested
- Attending and completing the induction before starting work
- Reporting hazards and following site rules from day one
For subcontractor workers, the principal contractor generally bears responsibility for the site-specific induction. The subcontractor’s employer remains responsible for trade-specific competency verification.
WorkSafe guidance makes clear that signatures alone do not prove comprehension. Delivery must include verification of understanding appropriate to the level of risk involved. A signed attendance sheet is a starting point, not a finish line.
Official guidance is available from Safe Work Australia, SafeWork SA, WorkSafe WA, WorkSafe Victoria and SafeWork NSW. Each state regulator publishes jurisdiction-specific guidance, so check the page relevant to your site location.
What should your site induction checklist include?
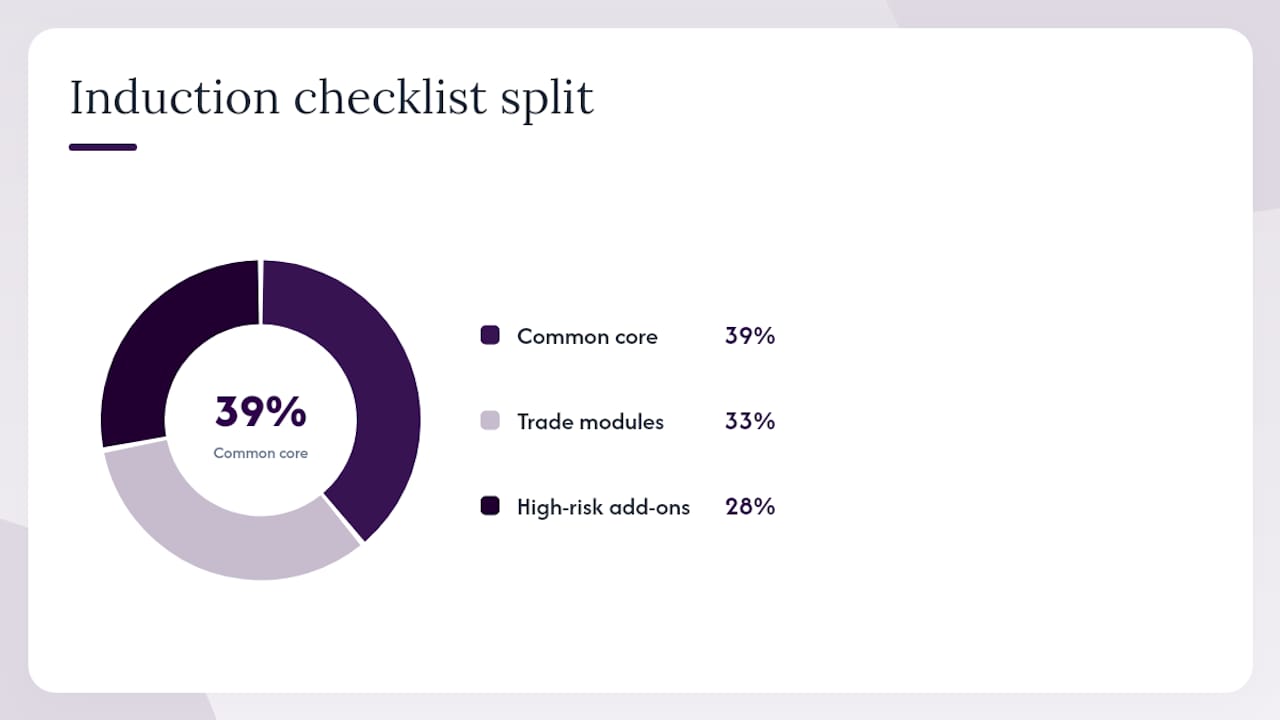
A defensible induction checklist groups items into three tiers: a common core that every contractor receives, trade-specific modules added by task type, and high-risk add-ons for activities like confined space entry or working at heights.
| Category | Checklist items |
|---|---|
| Common core | Site layout and access points; emergency procedures and muster points; first aid locations and trained officers; incident and near-miss reporting; PPE requirements by zone; communication protocols and stop-work authority; housekeeping and waste disposal |
| Trade-specific modules | Hazardous substances and SDS locations; asbestos register and controls; traffic management and vehicle interfaces; permit-to-work overview; electrical isolation procedures; working at heights controls |
| High-risk add-ons | Confined space entry procedures; hot work permits; explosive-powered tools; crane and rigging controls; Working with Children Check (where site access involves children) |
Pre-arrival documents to verify before granting access:
- Current public liability insurance certificate (minimum $10 million is common, though your contract will specify)
- Workers’ compensation insurance (or evidence of sole trader exemption where applicable)
- Relevant trade licences and competency cards (e.g., electrical licence, EWP ticket, asbestos removal licence)
- SWMS or RAMS for high-risk construction work
- Working with Children Check where the site involves contact with minors
- Photo ID for identity verification
Safe Work Australia’s construction induction information sheet lists the minimum topics that must be covered and is a reliable starting point for building your own template. The Department of Education and Training Victoria also provides a two-part template with version-control fields built in.
Pro Tip: Version-control your induction materials. Date-stamp each version, record which version a contractor received, and update the checklist whenever site conditions change. An auditor will ask which version was in use on the day of an incident.
For a practical onboarding checklist you can adapt for smaller sites, the contractor onboarding checklist from TurnTrack offers a useful reference.
Which delivery method suits your site?
There is no single right answer. The best method depends on site risk, workforce literacy and how many contractors you are inducting at once.
Face-to-face delivery combines a presentation with a physical site walk. It is the most defensible method for high-risk sites because you can observe comprehension in real time. The downside is time: a thorough face-to-face induction can take 60–90 minutes per person.

Online pre-arrival modules let contractors complete generic content (policy, code of conduct, environmental rules, permit overview) before they arrive. This frees the on-site session for the physical walk-through and practical demonstrations that actually improve comprehension. WA Country Health Service’s online contractor registration portal is a working example: contractors upload licences and insurance and complete modules before setting foot on site.
Blended delivery is the current best-practice model. Pre-arrival online completion handles generic content; the on-site session covers site geometry, live hazards and a short comprehension check. It reduces on-site induction time without sacrificing safety.
When to insist on a physical walk-through regardless of what was completed online:
- High-risk activities (confined spaces, working at heights, hot work)
- Complex site geometry where a map does not capture the reality
- Sites with live traffic or plant movements
- Any contractor who has not worked on that specific site before
Pro Tip: A short quiz or practical demonstration beats a signature every time. Ask the contractor to point out the nearest muster point, locate the first aid kit, or describe the stop-work authority process. That 90-second check is far more defensible than a tick-box.
How do you verify documents and keep records?
Verification is not just collecting documents. It means confirming they are current, authentic and relevant to the task. A photocopy of an expired licence is not verification.
Minimum documents to verify and record:
- Photo ID (confirm identity matches licence)
- Trade licences and competency cards (check expiry dates against the relevant licensing authority)
- Insurance certificates (check policy period, coverage type and insured amount)
- SWMS/RAMS (confirm it is task-specific, not a generic template)
- Working with Children Check number and expiry (where required)
- Drug and alcohol clearance where required by site policy
Acceptable evidence formats include certified copies, digital uploads with timestamps, or direct verification against a licensing authority’s online register (e.g., the Queensland Building and Construction Commission licence search).
Education Victoria’s contractor OHS induction guidance specifies that records must capture the person’s identity, the induction version received, the assessor’s name, the date and the assessment result. Store these in a central, retrievable system, not a folder of loose paper.
Recommended record fields:
- Full name and photo ID reference
- Induction version and date completed
- Assessor name
- Assessment score or pass/fail result
- Induction expiry date
- Document reference numbers (licence, insurance policy)
Pro Tip: Tie induction status to physical access. A QR-coded site card, a gate system or even a simple colour-coded sticker system means access is only possible for workers whose induction is current and on record. Policy without enforcement is just paperwork.
When do contractors need to be re-inducted?
Industry practice treats 12 months as the baseline validity period for a site-specific induction, and it is a defensible minimum for audits. The Department of Education and Training Victoria recommends this period explicitly and requires re-induction when site conditions change.
Beyond the annual refresh, re-induction is required when:
- Significant site changes occur (new hazards, altered site layout, new permit systems)
- A contractor has been absent from the site for six months or more
- A post-incident review identifies a gap in the contractor’s understanding
- A licence or competency card expires and is renewed under different conditions
- The contractor changes trade or task scope on the same site
- The induction materials themselves are updated to a new version
Set date-triggered reminders in your system so expiry does not catch you off guard. Automated flags are far more reliable than manual diary entries, particularly when you are managing multiple contractors across multiple sites.
A step-by-step contractor induction workflow
Phase 1: before arrival
- Send a pre-qualification questionnaire covering trade, licences, insurance and relevant experience.
- Request and verify all pre-arrival documents (insurance, licences, SWMS/RAMS, ID).
- Issue the online pre-arrival induction module and confirm completion before scheduling site access.
- Block site access in your system until all Phase 1 items are cleared.
Phase 2: on-site delivery
- Brief core site hazards, emergency procedures, muster points and first aid locations.
- Conduct a physical site walk for any contractor undertaking high-risk tasks.
- Verify PPE compliance before the walk-through begins.
- Run a short comprehension check (quiz, verbal Q&A or practical demonstration).
- Issue the site access token, card or QR pass on successful completion.
Phase 3: after completion
- Record all results in a central system with the required fields (name, version, assessor, score, expiry).
- Link induction status to the permit-to-work system so permits cannot be issued to non-inducted workers.
- Include induction reminders in daily toolbox talks for the first week.
- Schedule automated expiry reminders at 30 days and 7 days before the induction lapses.
- Collect brief contractor feedback to identify gaps in the induction content.
Pro Tip: Integrate induction completion as a prerequisite in your permit-to-work system. If a permit cannot be generated for a worker whose induction has lapsed, the system enforces compliance without anyone needing to remember to check.
How Ask Hayley helps you manage induction admin
Managing induction records manually is one of the most common admin burdens for small trade businesses. Chasing documents, tracking expiry dates and keeping version-controlled records takes real time, especially when you are on-site with your hands full.
Ask Hayley’s platform supports induction administration in practical ways:
- Compliance document storage — store insurance certificates, licences and SWMS in one central place, linked to each contractor profile.
- Expiry reminders — automated alerts flag upcoming licence and induction expiry so you are never caught out at audit.
- Safety and compliance documentation — Ask Hayley’s professional services team can build custom induction templates and compliance documentation tailored to your trade and site type.
- Voice-first access — capture an induction completion or flag a document gap by voice while you are on-site, without stopping to open a dashboard.
- Integrations — connections with Xero and AroFlo mean compliance records sit alongside your financial and job management data.
A typical use case: a sole-trader electrician uses Ask Hayley to store subcontractor insurance certificates, set 30-day expiry reminders and capture induction sign-offs by voice at the start of each job. No spreadsheet, no paper folder, no scramble at audit time.
Pro Tip: Use Ask Hayley’s services page to explore compliance documentation packages. A professionally prepared induction template, version-controlled and trade-specific, is a one-time investment that pays off every time an auditor or principal contractor asks for your records.
What actually goes wrong with contractor inductions?
Most induction failures come down to three things: paperwork-only delivery, no comprehension check, and induction status that is never tied to actual site access. You can have a beautifully formatted checklist and still fail an audit if none of those three are addressed.
The paperwork-only induction is the most common. A contractor signs a form, receives a slide deck and is waved through the gate. WorkSafe guidance is explicit that this approach does not demonstrate understanding. The fix is straightforward: add a short quiz or a 60-second verbal check at the end of every induction, and record the result.
Modular inductions solve another common problem: induction fatigue. When a contractor sits through two hours of generic content before getting to the site-specific material, retention drops sharply. Move the generic content online and pre-arrival, then use the on-site time for the physical walk and the comprehension check. The on-site session becomes shorter, more focused and more memorable.
The third failure mode is the most operationally dangerous. If a contractor whose induction has lapsed can still badge through the gate, the policy is not working. Tie induction status to access control, whether that is a QR pass, a site card system or a simple colour-coded sticker updated weekly. Gate enforcement is what converts a policy into an operational control.
One practical fix worth building into your process: run a 10-minute “first-job” checklist with the site supervisor during the contractor’s first hour of work. Ask them to locate the muster point, identify the nearest first aid kit and describe the stop-work process. It takes almost no time and catches the gap between what was covered in the induction and what the contractor actually retained.
Induction admin without the paperwork pile
Keeping contractor inductions compliant does not have to mean a filing cabinet full of certificates and a calendar full of manual reminders. Ask Hayley’s safety and compliance documentation services give you professionally prepared, trade-specific induction templates you can use immediately, version-controlled and ready for audit.

For ongoing admin, the Ask Hayley platform handles document storage, expiry alerts and voice-captured record updates so you can manage compliance from the site, not the office. Whether you need a one-off induction template or a full compliance documentation package, the team can help. Visit Ask Hayley’s services page to find the right fit for your business and get started.
Sources
Use these official sources to build and audit-proof your induction materials:
- Induction — SafeWork SA
- Effective inductions – WorkSafe – LGIRS
- Information sheet — Work induction for construction (Safe Work Australia)
- Contractor OHS induction — Department of Education and Training Victoria
- Online contractor registration and induction — WA Country Health Service
Save these pages and check them when your induction materials are due for review. Regulators update guidance periodically, and using a current version is part of your audit defence.


